Install OS to eMMC
Step 1 - Download U-Boot only image and an Helios64 image build
To emulate the internal eMMC as USB Mass Storage, special u-boot image is needed. Download the microSD card image from here.
You will also need to download an OS image to write to the internal eMMC.
Go to Download and chose one of the latest build.
Important
- OMV (OpenMediaVault) is only supported on Debian OS.
- Armbian 20.08.8 and earlier version has bug that prevent system to boot from eMMC!
Step 2 - Writing U-Boot image to a microSD Card
You will need to use an image writing tool to write helios64_sdcard_u-boot-only.img.xz to microSD Card.
Under Windows, Mac OS or Linux (via Graphic Interface)
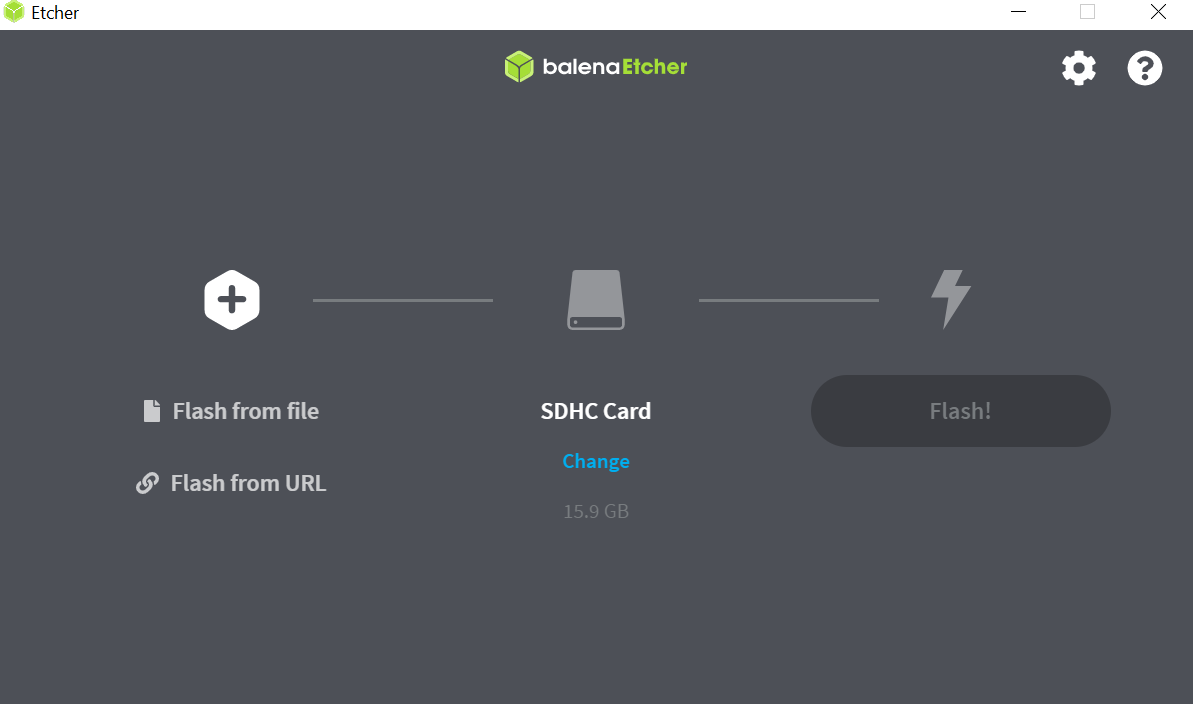
Etcher is a graphical SD card writing tool that works on Mac OS, Linux and Windows, this is the easiest method for most users. Etcher also supports writing images directly from XZ files, without any prerequired decompression. To write your image with Etcher:
- Download Etcher and install it on your computer.
- Insert the microSD Card inside your SD card reader (microSD to SD adapter might be needed).
- Open Etcher and select the helios64_sdcard_u-boot-only.img.xz image file from your local storage.
- Select the microSD Card you wish to write your image to.
- Review your selections and click 'Flash!' to begin writing data to the microSD Card.
Under Linux (using dd via Terminal)
Armbian images are using XZ compression format, therefore we need xz-utils or xz tools to decompress the image first.
for Debian-based distribution (Debian/Ubuntu) you can install the utility using following command:
apt-get install xz-utils
in RedHat-based distribution (RHEL / CentOS / Fedora Linux) users can use this command:
yum install xz
after installing the compression tool, you can now decompress the images:
xz -dk helios64_sdcard_u-boot-only.img.xz
finally we can write the images to sdcard using dd:
sudo dd if=helios64_sdcard_u-boot-only.img of=/dev/sdX bs=4M conv=fsync status=progress
Note
/dev/sdX is where the microSD is mapped in your Linux machine, change the 'X' to your corresponding mapped device. If you set /dev/sdX to a wrong device then you might risk erasing a hard drive or different device than the designated microSD.
Step 3 - Wire Helios64
Warning
Always proceed with caution when manipulating 110/220V appliance.
Important
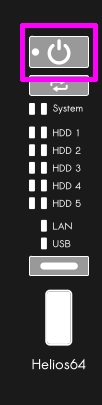
If your system has the UPS battery accessory installed, then check your board is really powered off before going any further. Check Front Panel System ON LED or Board System ON LED is off. If not off, then press Power-On Button for ~4 seconds until System ON LED goes off.
-
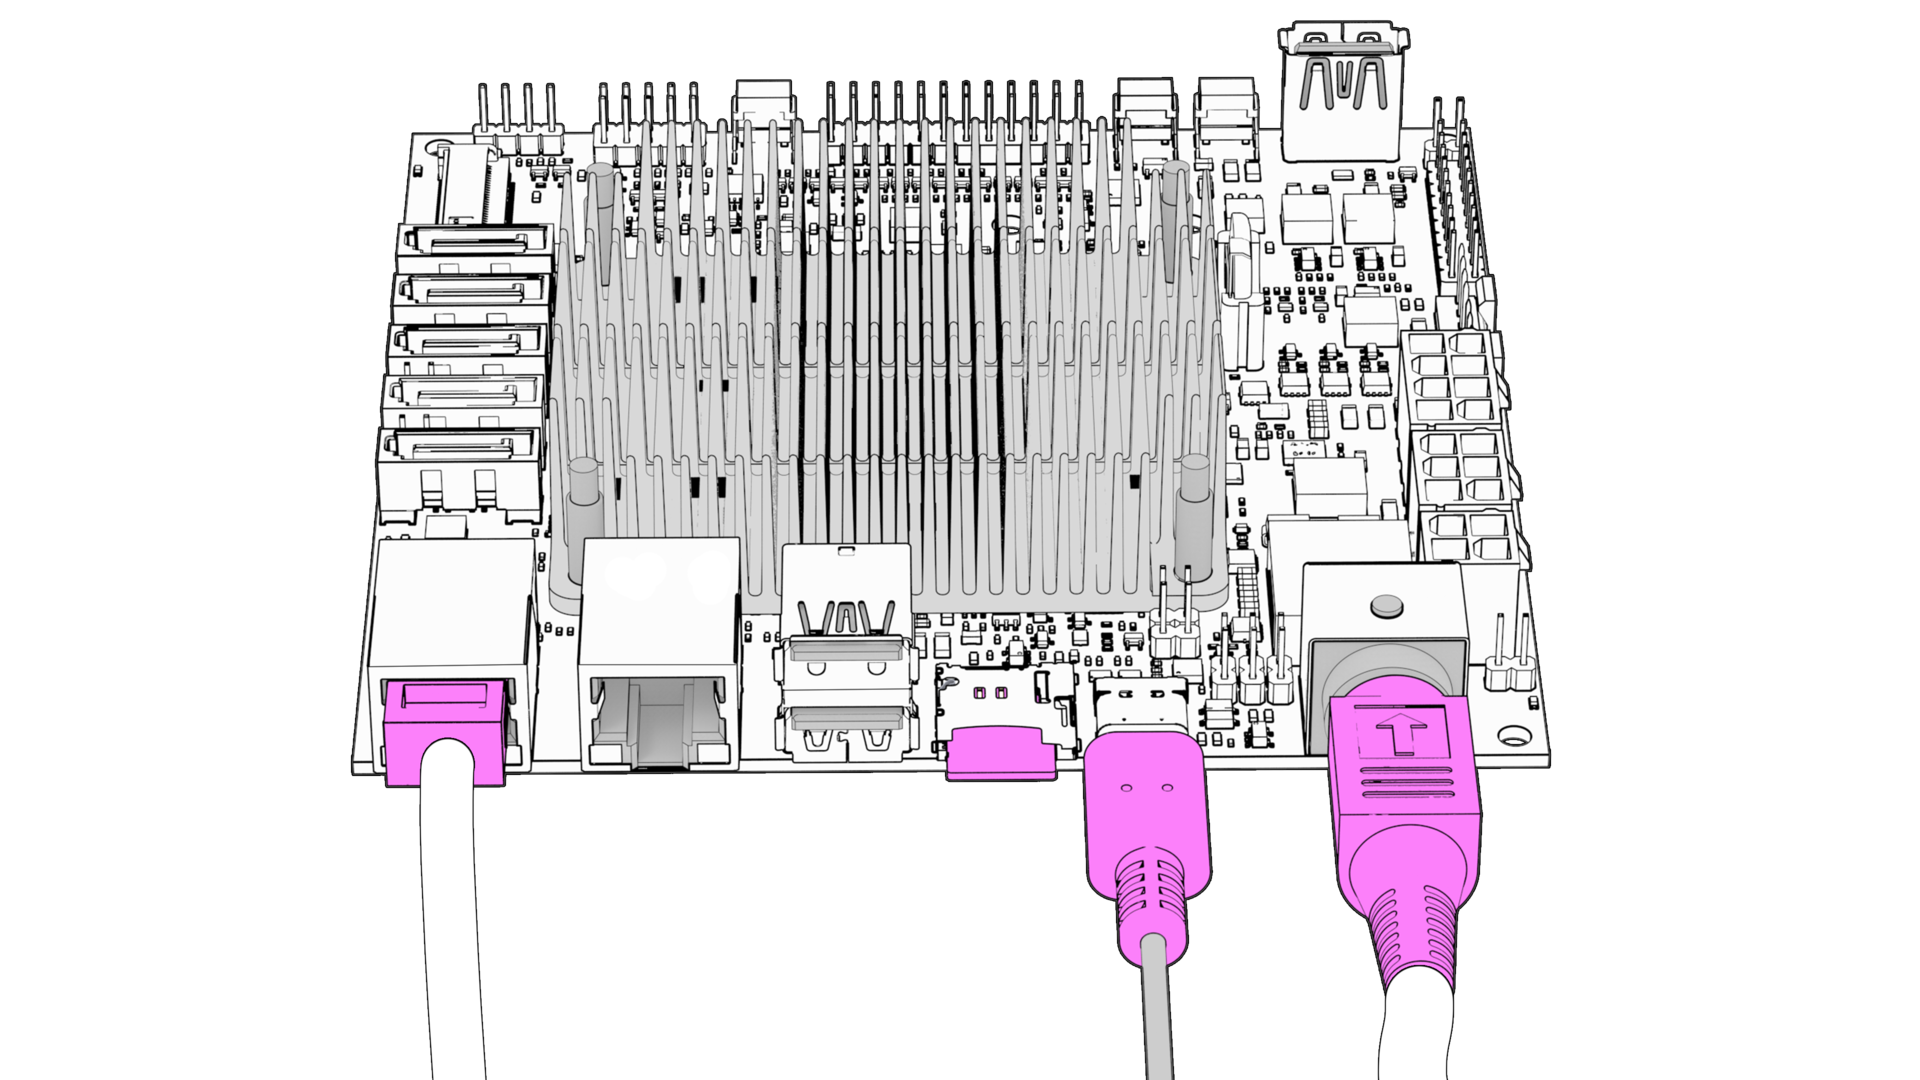
Insert the prepared microSD Card.
-
Connect your computer to the serial port with the Type-C to Type-A USB cable.
-
Connect Helios64 to your home network with the Ethernet cable.
Choose LAN2 port if you have 2.5Gb network. -
Plug-in the DC power connector. Don't power-up the Power Adapter yet.
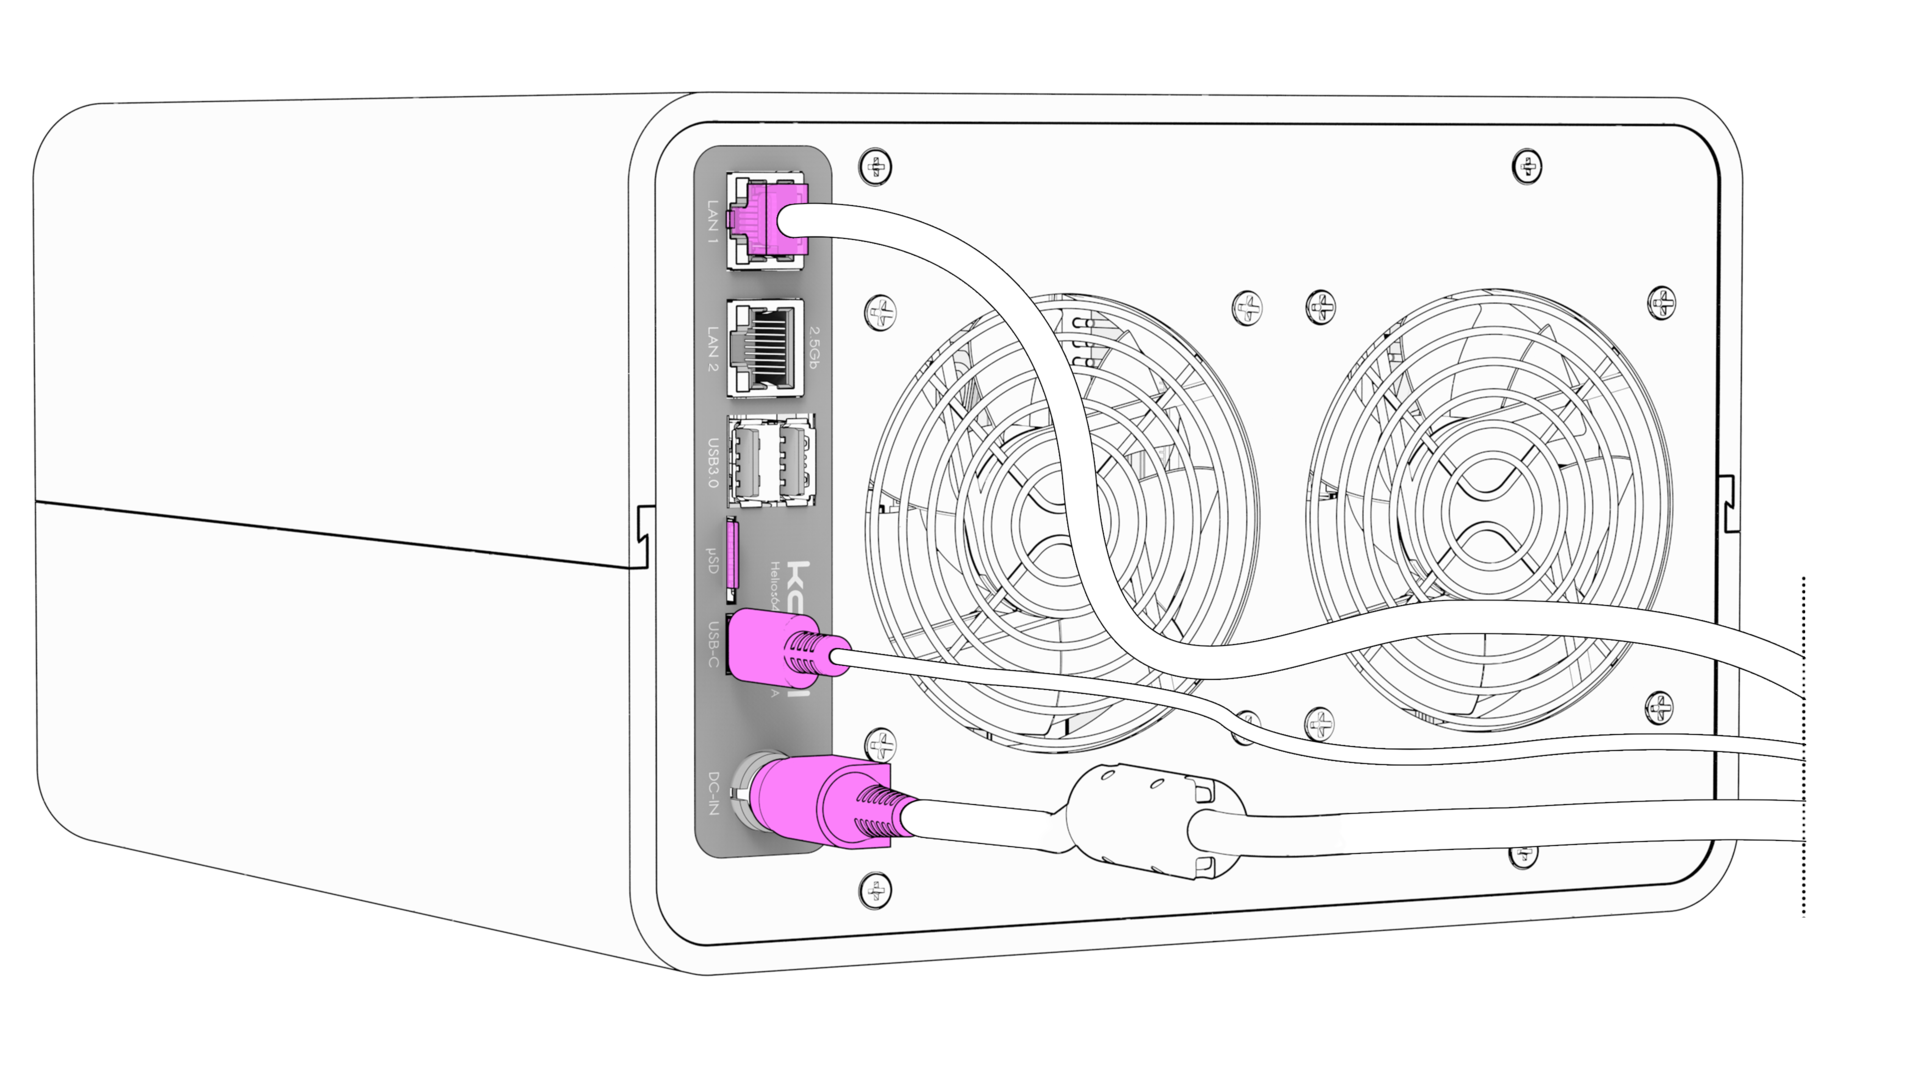
If you are using Helios64 without an enclosure:
Step 4 - Power-Up Helios64
Now that everything is ready you can plug-in the AC adapter and push the Power-On Button.
If you are using Helios64 without an enclosure:

Step 5 - Writing an OS image to Internal eMMC
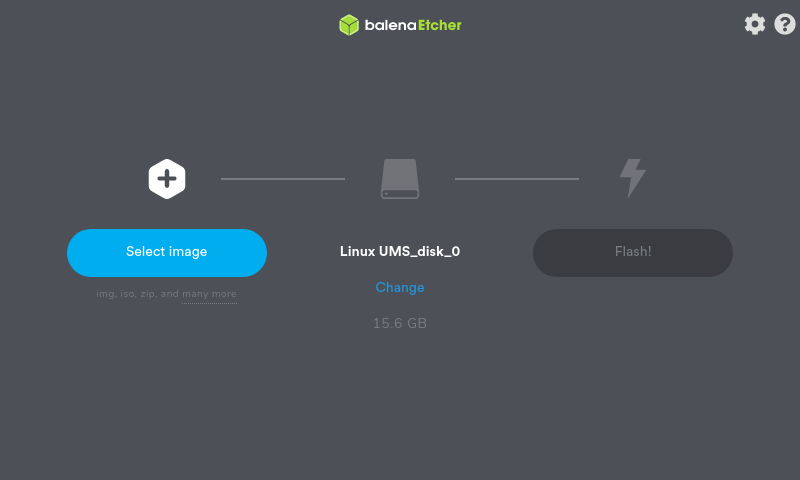
After you have powered-up Helios64, your computer should have detected a new storage device called Linux UMS disk 0.
Now write Helios64 OS image that you have downloaded in Step 1 to the above detected storage device.
Using Etcher
- Open Etcher and select the Helios64 image file from your local storage.
- Select "Linux UMS disk 0" drive.
- Review your selections and click 'Flash!' to begin writing data to the microSD Card.
Using dd via Terminal
Decompress the image:
xz -dk Armbian_20.08.0_Helios64_buster_current_5.7.15.img.xz
finally we can write the image to eMMC using dd:
sudo dd if=Armbian_20.08.0_Helios64_buster_current_5.7.15.img of=/dev/sdX bs=4M conv=fsync status=progress
Replace the filename by the image file name you downloaded.
Note
/dev/sdX is where the "Linux UMS_disk_0" is mapped in your Linux machine, change the 'X' to your corresponding mapped device. If you set /dev/sdX to a wrong device then you might risk erasing a hard drive or different device than the designated Helios64 internal eMMC.
Step 6 - Power-Down Helios64
Power down Helios64 by long pressing (~4 seconds) the Power Button and then remove the microSD card.
Now the setup is ready for its first start, go to First Start page for further instruction.