GPIO
User Accessible GPIOs (J12)
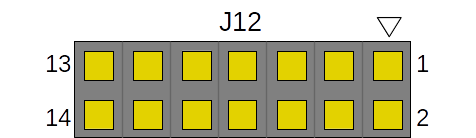
Helios4 provides 12 GPIOs on header J12 which can be used for user application. Those GPIOs are provided via an 16-bit IO Expander PCA9655E connected to I2C bus 0.
Pinout Table
| Pin | Port | Remarks |
|---|---|---|
| 1 | - | 3.3V supply |
| 2 | IO0_2 | |
| 3 | IO0_3 | |
| 4 | IO0_4 | |
| 5 | IO0_7 | |
| 6 | IO1_0 | |
| 7 | IO1_1 | |
| 8 | IO1_2 | |
| 9 | IO1_3 | |
| 10 | IO1_4 | |
| 11 | IO1_5 | |
| 12 | IO1_6 | |
| 13 | IO1_7 | |
| 14 | - | GND |
Warning
Ports IO0_0, IO0_1, IO0_5, and IO0_6 are reserved for system use.
Important
It is not advisable to access the I2C IO Expander directly using I2C utilities.
Accessing GPIOs under Linux
If the kernel supports debugfs (CONFIG_DEBUG_FS=y), list of GPIOs can be retrieved with the following command
sudo cat /sys/kernel/debug/gpio
Look for the gpiochip2: GPIOs XXX-YYY section, whereas XXX is first GPIO number and YYY is last GPIO number of IO expander.
gpiochip2: GPIOs 496-511, parent: i2c/0-0020, pca9555, can sleep:
 gpio-496 (                    |board-rev-0         ) in  lo
 gpio-497 (                    |board-rev-1         ) in  lo
 gpio-498 (                    |(null)              ) out hi
 gpio-499 (                    |(null)              ) in  hi
 gpio-500 (                    |(null)              ) in  hi
 gpio-501 (                    |usb-overcurrent-stat) in  hi
 gpio-502 (                    |USB-PWR             ) out hi
 gpio-503 (                    |(null)              ) in  hi
 gpio-504 (                    |(null)              ) in  hi
 gpio-505 (                    |(null)              ) in  hi
 gpio-506 (                    |(null)              ) in  hi
 gpio-507 (                    |(null)              ) in  hi
 gpio-508 (                    |(null)              ) in  hi
 gpio-509 (                    |(null)              ) in  hi
 gpio-510 (                    |(null)              ) in  hi
 gpio-511 (                    |(null)              ) in  hi
Another way to get first GPIO number of the IO expander
cat /sys/bus/i2c/devices/0-0020/gpio/gpiochip*/base
Therefore the mapping between header J12 Pins and Sysfs GPIO numbers will be as described in the following table
GPIO Table
| Pin | Sysfs GPIO number | Remarks |
|---|---|---|
| 1 | - | 3.3V supply |
| 2 | 498 | |
| 3 | 499 | |
| 4 | 500 | |
| 5 | 503 | |
| 6 | 504 | |
| 7 | 505 | |
| 8 | 506 | |
| 9 | 507 | |
| 10 | 508 | |
| 11 | 509 | |
| 12 | 510 | |
| 13 | 511 | |
| 14 | - | GND |
Note
The mapping table is unlikely to change between Kernel version.
GPIO Control
1. Export the GPIO number you want to use
echo N | sudo tee -a /sys/class/gpio/export
2. Set the direction, "out" for Output or "in" for Input
echo DIRECTION | sudo tee -a /sys/class/gpio/gpioN/direction
3. Now you can read or change the GPIO value
To read GPIO value
cat /sys/class/gpio/gpioN/value
To change GPIO value (only if GPIO set as Output)
echo VALUE | sudo tee -a /sys/class/gpio/gpioN/value
Notes
Pay attention to the path, /sys/class/gpio/gpioN/ where N is the GPIO number.
Example
Set IO1_7 (pin 13) output as high
echo 511 | sudo tee -a /sys/class/gpio/export
echo "out" | sudo tee -a /sys/class/gpio/gpio511/direction
echo 1 | sudo tee -a /sys/class/gpio/gpio511/value
Use GPIO with Device Tree Overlay
Info
Device Tree Compiler (dtc) from OS package manager usually is too old, use the one from kernel source or download binary version for Arm here.
Another way to use the GPIO is by using device tree. In device tree the user accessible GPIO is labelled as expander0.
Instead of directly modifying the Helios4 device tree source (armada-388-helios4.dts) and recompiling, Linux and U-Boot provide a mechanism called device tree overlay. With overlay, user just needs to create simple device tree that would be overlay'd on top of base device tree.
For example, to use IO0_2 as power off button input, create following device tree source and save it as power-button.dts
/dts-v1/;
/plugin/;

/ {
    fragment@0 {
        target-path = "/gpio-keys";
        __overlay__ {
            power-button {
                label = "Soft Power Off";
                linux,code = <116>;
                gpios = <&expander0 2 1>;
            };
        };
    };
};
Download dtc and compile device tree with this command
wget https://wiki.kobol.io/helios4/files/dt-overlay/dtc.bin
chmod 755 dtc.bin
./dtc.bin -I dts -O dtb -o power-button.dtbo power-button.dts
Button Wiring
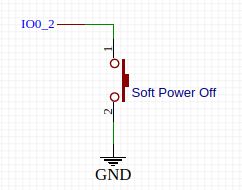
The GPIO has internal pull up resistor, when the button is not pressed the input read as High and when the button is pressed the input read as Low, therefore we use active low flag.
In the above example you will find the 2 following lines
linux,code = <116>;
gpios = <&expander0 2 1>;
For linux,code property, you can use one of the following values. For complete even code list refer to input-event-codes.h.
| Event Code Name | Event Code | Description |
|---|---|---|
| KEY_POWER | 116 | Power Button |
| KEY_SLEEP | 142 | Sleep Button |
| KEY_WAKEUP | 116 | Power Button |
| BTN_0 | 0x100 | User Button 0 |
| BTN_1 | 0x101 | User Button 1 |
| BTN_2 | 0x102 | User Button 2 |
| BTN_3 | 0x103 | User Button 3 |
| BTN_4 | 0x104 | User Button 4 |
| BTN_5 | 0x105 | User Button 5 |
| BTN_6 | 0x106 | User Button 6 |
| BTN_7 | 0x107 | User Button 7 |
| BTN_8 | 0x108 | User Button 8 |
| BTN_9 | 0x109 | User Button 9 |
For gpios properties, the syntax is as follow
<&expander0 index flag>
Where index is one of the following values
| Port Number | Index |
|---|---|
| IO0_2 | 2 |
| IO0_3 | 3 |
| IO0_4 | 4 |
| IO0_7 | 7 |
| IO1_0 | 8 |
| IO1_1 | 9 |
| IO1_2 | 10 |
| IO1_3 | 11 |
| IO1_4 | 12 |
| IO1_5 | 13 |
| IO1_6 | 14 |
| IO1_7 | 15 |
And flag is one of the following values
| Flag | Property |
|---|---|
| 0 | GPIO line is active high |
| 1 | GPIO line is active low |
For more info please refer to gpio-keys binding.
Device Tree Overlay under Armbian
Info
Armbian older than version 5.98 is still not compiled with overlay support. Refer to instruction to Compile Helios4 DTB with Symbol Support or use precompiled binary.
Armbian Default (Stretch, Linux Kernel 4.14):
wget https://wiki.kobol.io/helios4/files/dt-overlay/lk4.14_armada-388-helios4.dtb
sudo cp lk4.14_armada-388-helios4.dtb /boot/dtb/armada-388-helios4.dtb
Armbian Next (Buster, Linux Kernel 4.19):
wget https://wiki.kobol.io/helios/files/dt-overlay/lk4.19_armada-388-helios4.dtb
sudo cp lk4.19_armada-388-helios4.dtb /boot/dtb/armada-388-helios4.dtb
Create /boot/overlay-user/ to store the overlay and copy the overlay to the folder
sudo mkdir -p /boot/overlay-user
sudo cp power-button.dtbo /boot/overlay-user/
Then edit /boot/armbianEnv.txt and append the overlay filename (without dtbo extension) to user_overlays
user_overlays=power-button
Reboot the system to load the overlay.
Notes
If there is more than one overlay file, separate it by space. For example
user_overlays=power-button sleep-button
Additional Steps for U-Boot 2018.11 (Armbian Default)
Bootscript (boot.scr) used in Armbian Default does not have routine to automatically load overlay from /boot/overlay-user therefore /boot/boot.cmd need to be modified.
Append the following block
fdt addr ${fdt_addr}
fdt resize 65536

for overlay_file in ${user_overlays}; do
    if load ${boot_interface} 0:1 ${loadaddr} ${prefix}overlay-user/${overlay_file}.dtbo; then
        echo "Applying user provided DT overlay ${overlay_file}.dtbo"
        fdt apply ${loadaddr} || setenv overlay_error "true"
    fi
done

if test "${overlay_error}" = "true"; then
    echo "Error applying DT overlays, restoring original DT"
    load ${boot_interface} 0:1 ${fdt_addr} ${prefix}dtb/${fdtfile}
fi
before
bootz ${kernel_addr_r} ${ramdisk_addr_r} ${fdt_addr}
so it become
fdt addr ${fdt_addr}
fdt resize 65536

for overlay_file in ${user_overlays}; do
    if load ${boot_interface} 0:1 ${loadaddr} ${prefix}overlay-user/${overlay_file}.dtbo; then
        echo "Applying user provided DT overlay ${overlay_file}.dtbo"
        fdt apply ${loadaddr} || setenv overlay_error "true"
    fi
done

if test "${overlay_error}" = "true"; then
    echo "Error applying DT overlays, restoring original DT"
    load ${boot_interface} 0:1 ${fdt_addr} ${prefix}dtb/${fdtfile}
fi

bootz ${kernel_addr_r} ${ramdisk_addr_r} ${fdt_addr}
Recompile with
mkimage -C none -A arm -T script -d /boot/boot.cmd /boot/boot.scr
Device Tree Overlay under Other Distro
Compile Helios4 DTB with Symbol Support
Download Linux Kernel source code and extract it to ~/src/linux. Change directory to ~/src/linux
Download and apply kernel patch for
- Linux Kernel 4.14
wget https://wiki.kobol.io/helios4/files/dt-overlay/compile-dtb-lk-4.14.patch
git apply --apply compile-dtb-lk-4.14.patch
- Linux Kernel 4.19
wget https://wiki.kobol.io/helios4/files/dt-overlay/compile-dtb-lk-4.19.patch
git apply --apply compile-dtb-lk-4.19.patch
Compile Helios4 device tree
make armada-388-helios4.dtb
Copy the dtb to boot folder (eg. /boot/dtb/)
sudo cp arch/arm/boot/dts/armada-388-helios4.dtb /boot/dtb/
Copy the overlay also to the same folder.
Apply overlay on U-Boot
To apply overlay to base dtb, the procedure is
- Load Helios4 dtb to memory
- Set fdt address to dtb address
- Resize the fdt
- Load overlay to memory
- Apply from overlay address
- Boot the kernel
Example command
load mmc 0:1 ${ramdisk_addr_r} /boot/uInitrd
load mmc 0:1 ${kernel_addr_r} /boot/zImage

load mmc 0:1 ${fdt_addr_r} /boot/dtb/${fdtfile}
fdt addr ${fdt_addr_r}
fdt resize 65536
load mmc 0:1 0x300000 /boot/dtb/power-button.dtbo
fdt apply 0x300000

bootz ${kernel_addr_r} ${ramdisk_addr_r} ${fdt_addr_r}