I2C (OLED)
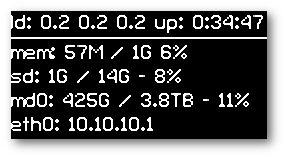
This tutorial will explain how to connect and setup an I2C OLED screen to display System Status as show in the following captures :

Info
You can find I2C OLED display on Aliexpress.com. Search for "i2c oled 1.3".
Connect OLED Display
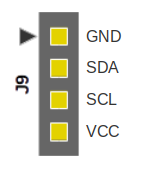
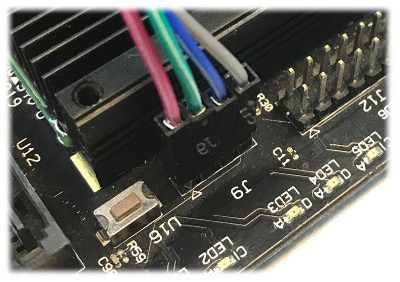
The I2C interface on Helios4 board is located at header J9 which exposes the SoC I2C Bus 1. Below is the header pin-out, the little arrow on the PCB indicates the GND pin.
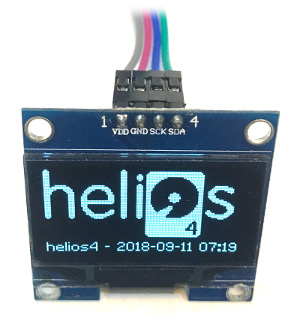
You will need to use Female to Female Jumper Wire (a.k.a Dupont Cable) to connect your display to Helios4 board.
Connect matching pin on each side (GND to GND, VCC to VCC, SDA to SDA, etc...). Ideally you use cables of different colors to easily check that your wiring is correct.
Check I2C Communication
To check if the system can communicate with the OLED device, we should first scan the I2C bus to see if we can detect the device.
- Install the Linux i2c tools.
$ sudo apt-get install i2c-tools
- Use i2cdetect tool to scan I2C Bus 1.
root@helios4:~# i2cdetect -y 1

     0  1  2  3  4  5  6  7  8  9  a  b  c  d  e  f
00:          -- -- -- -- -- -- -- -- -- -- -- -- --
10: -- -- -- -- -- -- -- -- -- -- -- -- -- -- -- --
20: -- -- -- -- -- -- -- -- -- -- -- -- -- -- -- --
30: -- -- -- -- -- -- -- -- -- -- -- -- 3c -- -- --
40: -- -- -- -- -- -- -- -- -- -- -- -- -- -- -- --
50: -- -- -- -- -- -- -- -- -- -- -- -- -- -- -- --
60: -- -- -- -- -- -- -- -- -- -- -- -- -- -- -- --
70: -- -- -- -- -- -- -- --
Here we can see there is a device detected at the address 0x3c. We can conclude is our OLED screen, unless you have connected more than just one I2C device on the J9 header.
SYS-OLED Application
sys-oled is an application to display Helios4 system status on I2C OLED display.
- Based on luma.oled
- Inspired from luma.oled sys_info.py example
Installation
git clone https://github.com/kobol-io/sys-oled.git
cd sys-oled
sudo ./install.sh
Configuration
1. Configure OLED display model
Test which display model is the correct one by launching manually sys-oled and trying different display model as parameter until the System Status is showing correctly on the display.
Info
If you get your OLED display as part of your Helios4 Kit, then you can skip to next step since sys-oled is already configure to use the correct model.
Example :
sudo sys-oled --display ssd1306
sudo sys-oled --display sh1106
Supported values : ssd1306 (default), ssd1322, ssd1325, ssd1327, ssd1331, ssd1351, sh1106.
Once you know which display model is the correct one, edit /etc/sys-oled.conf and update the display_model= line.
2. Configure display info
By default sys-oled will display usage info of your micro SDcard which is most probably your Root File System. You can display storage usage info of one more storage device by editing /etc/sys-oled.conf
sudo nano /etc/sys-oled.conf
You can edit the following lines to define for which storage devices you want to display usage info.
# Storage Device 1
# Device name
storage1_name = sd

# Device mount path
storage1_path = /

# Storage Device 2
storage2_name= md0
storage2_path= /mnt/md0
In the above example, we are displaying sd (SDcard) usage which is the rootfs mounted on '/'. We are also displaying md0 (RAID array) that is mounted on '/mnt/mnd0'.
3. Start the service
The install script will have automatically setup sys-oled to start at every startup. Now you can either restart your Helios4 or you can launch directly the service with the following command:
systemctl start sys-oled.service
Note
This sys-oled app was developed and tested only with the OLED model SH1106 which has a matrix panel of 132 x 64. If you use a different model that has a smaller resolution, you might need to tweak the coordinate values in sys-oled file.