LED
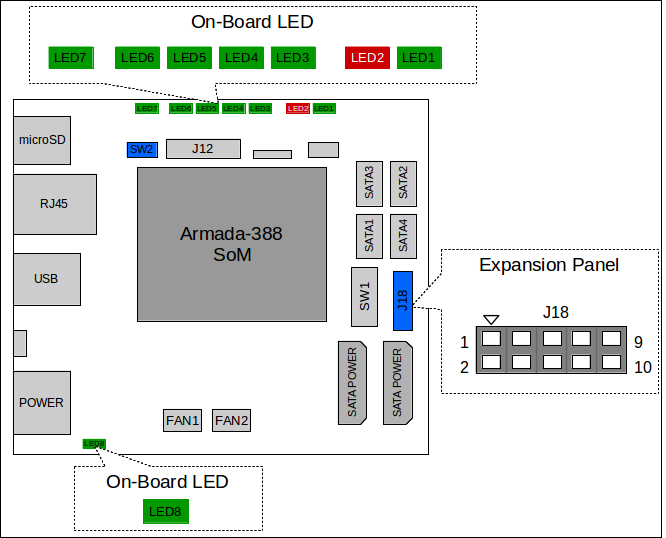
On-Board LEDs
| LED number | Color | Software control | Remarks |
|---|---|---|---|
| LED1 | Green | Yes | Active-low |
| LED2 | Red | Yes | Active-low |
| LED3 | Green | Yes | Active-low |
| LED4 | Green | Yes | Active-low |
| LED5 | Green | Yes | Active-low |
| LED6 | Green | Yes | Active-low |
| LED7 | Green | Yes | Active-low |
| LED8 | Green | No | Power indicator |
Info
LED1 - LED7 is preconfigured for certain indicator under Linux, see LED under Linux section.
Expansion Panel (J18)
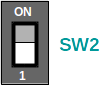
Helios4 board was designed to either use the on-board LEDs or use a custom expansion panel (not-available). If you wish to use the header, insure to switch to OFF the Dip Switch SW2.
Pinout Table
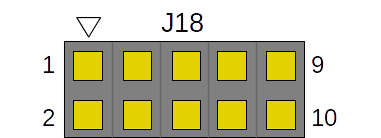
| Pin | LED number | Remarks |
|---|---|---|
| 1 | - | 3.3V supply |
| 2 | - | Not connected |
| 3 | LED1 | Active-low |
| 4 | LED2 | Active-low |
| 5 | LED3 | Active-low |
| 6 | LED4 | Active-low |
| 7 | LED5 | Active-low |
| 8 | LED6 | Active-low |
| 9 | LED7 | Active-low |
| 10 | - | GND |
Info
LED1 - LED7 is preconfigured for certain indicator under Linux, see LED under Linux section.
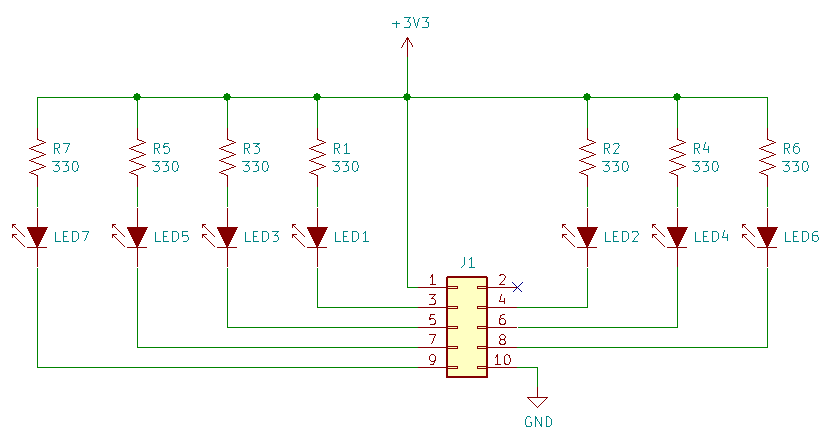
Wiring Diagram
Since the signals to control the LEDs are active low, connect the pin to LED's cathode. Below a wiring diagram example.
LED under Linux
| LED | Name | Default Trigger | Remarks |
|---|---|---|---|
| LED1 | helios4:green:status | heartbeat | Blinking periodically |
| LED2 | helios4:red:fault | none | See Configuring Fault LED |
| LED3 | helios4:green:ata1 | ata1 | Blinking on SATA1 activity |
| LED4 | helios4:green:ata2 | ata2 | Blinking on SATA2 activity |
| LED5 | helios4:green:ata3 | ata3 | Blinking on SATA3 activity |
| LED6 | helios4:green:ata4 | ata4 | Blinking on SATA4 activity |
| LED7 | helios4:green:usb | usb-host | Blinking on USB activity, any port |
Note
ata trigger requires additional patch to mainline kernel. The patch can be found here. Armbian builds are already patched, so no action is required.
The LEDs can be accessed under LEDs class in sysfs.
root@helios4:~/# ls -l /sys/class/leds/

lrwxrwxrwx 1 root root 0 Dec  4 06:57 helios4:green:ata1 -> ../../devices/platform/io-leds/leds/helios4:green:ata1
lrwxrwxrwx 1 root root 0 Dec  4 06:57 helios4:green:ata2 -> ../../devices/platform/io-leds/leds/helios4:green:ata2
lrwxrwxrwx 1 root root 0 Dec  4 06:57 helios4:green:ata3 -> ../../devices/platform/io-leds/leds/helios4:green:ata3
lrwxrwxrwx 1 root root 0 Dec  4 06:57 helios4:green:ata4 -> ../../devices/platform/io-leds/leds/helios4:green:ata4
lrwxrwxrwx 1 root root 0 Dec  4 06:57 helios4:green:status -> ../../devices/platform/system-leds/leds/helios4:green:status
lrwxrwxrwx 1 root root 0 Dec  4 06:57 helios4:green:usb -> ../../devices/platform/io-leds/leds/helios4:green:usb
lrwxrwxrwx 1 root root 0 Dec  4 06:57 helios4:red:fault -> ../../devices/platform/system-leds/leds/helios4:red:fault
LEDs Trigger
- none
No automatic trigger. Manually control the LED by manipulating "brightness". More info see Configuring LED trigger.
- heartbeat
LED "double" flashes at a load average based rate. The interval might change during heavy load. If the LED no longer blinks, it means the system is locked-up or hung and has to be reset.
- ataN
LED blinks on any read/write activity at specific SATA port.
- usb-host
LED blinks on USB activity at any port.
- panic
This trigger allows LEDs to be configured to blink on a kernel panic.
- timer
This allows LEDs to be controlled by a programmable timer via sysfs. delay_on to set how long the LED turned on and delay_off to set how long the LED turned off.
Configuring LED trigger
To configure, simply set the trigger type. For example to set Status LED triggered by timer
echo timer | sudo tee -a /sys/class/leds/helios4\:green\:status/trigger
Some of the triggers may expose additional parameters that can be configured further.
On none trigger, to turn ON the LED set the brightness bigger than 0.
echo 1 | sudo tee -a /sys/class/leds/helios4\:green\:status/brightness
and to turn OFF the LED set the brightness to 0.
echo 0 | sudo tee -a /sys/class/leds/helios4\:green\:status/brightness
On timer trigger, it will exposed delay_on and delay_off with default value of 0.5 seconds for both. To change the delay, set the respective parameter (value in milliseconds)
echo 1000 | sudo tee -a  /sys/class/leds/helios4\:green\:status/delay_on
echo 200 | sudo tee -a  /sys/class/leds/helios4\:green\:status/delay_off
Note
The changes is not retained across reboot. Use startup script or udev rules to make it permanent.
Configuring Fault LED
While other LEDs are preconfigured, the fault LED remains unconfigured (trigger:none).
1. As Kernel Panic Indicator
To configure the LED as Kernel panic indicator, set the trigger to panic. However this functionality might be redundant with Status LED, since if a kernel panic occurs and/or system hangs, the Status LED will no longer blink.
To trigger kernel panic to test the LED, run
echo c > /proc/sysrq-trigger
Warning
Triggering kernel panic can lead to data loss. Use with caution!
2. As RAID Fault Indicator
To configure the LED as RAID fault indicator, please refer to MDADM: Configure Fault LED
Note
On Armbian builds, this is the default setting for fault LED.