SPI (NOR Flash)
The A388 System-On-Module used by Helios4 provides an 32 Mbit SPI NOR flash connected to SPI bus 1, Chip Select 0 (Winbond W25Q32BV Datasheet).
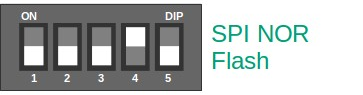
By default, Helios4 is configured to boot from microSD card. To boot from SPI NOR flash (after writing U-Boot into SPI NOR flash), please change Boot Mode on DIP Switch SW1 to:
Build U-Boot for SPI NOR flash
Refer to U-Boot page to build the image.
A prebuilt SPI image of U-Boot for Armbian OS can be downloaded from here (version 2013.01) or from here (version 2018.11).
Write U-Boot to SPI NOR flash
Important
Concurrent access on SPI NOR and SATA drives can lead to unstable SATA. The following instructions has taken this issue into consideration and workaround it by disabling the SATA temporary.
Under Armbian
Prerequisites: The following is only supported since Armbian release 5.64. Upgrade your system if necessary with the following command
sudo apt-get update && sudo apt-get upgrade
1) Edit /boot/armbianEnv.txt and enable spi_workaround. If the line doesn't exist, then just append it to the file.
spi_workaround=on
2) Reboot the system to apply the change
3) Log in to Helios4, verify whether mtdblock0 is present using lsblk
lsblk
NAME        MAJ:MIN RM  SIZE RO TYPE MOUNTPOINT
mtdblock0    31:0    0    4M  0 disk
mmcblk0     179:0    0 14.9G  0 disk
└─mmcblk0p1 179:1    0 14.8G  0 part /
4) Get the U-Boot SPI image
A. Install/Update U-Boot package from Armbian
sudo apt-get update
sudo apt-get -y install linux-u-boot-helios4-next
B. Download the Prebuilt Image from Wiki
U-Boot 2018.11
wget https://wiki.kobol.io/helios4/files/uboot/u-boot-armbian-2018.11-spi.bin
sudo mv u-boot-armbian-2018.11-spi.bin /usr/lib/linux-u-boot-next-helios4_*/u-boot.flash
Marvell U-Boot 2013.01
wget https://wiki.kobol.io/helios4/files/uboot/u-boot-armbian-2013.01-spi.bin
sudo mv u-boot-armbian-2013.01-spi.bin /usr/lib/linux-u-boot-next-helios4_*/u-boot.flash
C. Custom U-Boot SPI Image
Upload the U-Boot SPI binary that you built on your PC to Helios4 and rename it as u-boot.flash. For example, if the Helios4 IP address is 10.10.10.1 the command would be:
scp u-boot-spl.kwb root@10.10.10.1:/usr/lib/linux-u-boot-next-helios4_*/u-boot.flash
Note
Replace u-boot-spl.kwb with u-boot-a38x-*-spi.bin if you are using Marvell U-Boot 2013.01
5) Run nand-sata-install utility
sudo nand-sata-install
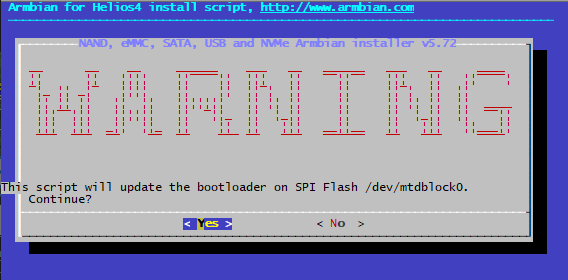
6) Select option Install/Update the bootloader on SPI Flash
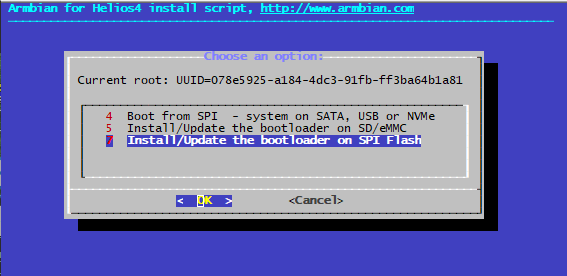
And confirm the operation
7) If you want to take the opportunity to move your RootFS to another device, jump to this section. Otherwise you may disable spi_workaround in /boot/armbianEnv.txt
spi_workaround=off
8) Set DIP switches SW1 to SPI Boot and reboot the system.
Under Generic Linux
Info
You will need to access to Helios4 via Serial Console. Please refer to Install page for instructions.
1) Upload the U-Boot SPI binary that you built to Helios4 and rename it as u-boot-spi.bin.
2) Download boot_spi_en.scr from here and put it to /boot/.
sudo wget https://wiki.kobol.io/helios4/files/uboot/boot_spi_en.scr -O /boot/boot_spi_en.scr
Source code of boot_spi_en.scr can be found here.
3) Switch to Helios4 serial console, then reboot the system
sudo reboot
4) Press any key to cancel the U-Boot autoboot and execute these commands
setenv script_name "/boot/boot_spi_en.scr"
stage_boot mmc_scr
It will boot to Linux with modified device tree.
5) Log in to Helios4, verify whether mtdblock0 is present using lsblk
lsblk
NAME        MAJ:MIN RM  SIZE RO TYPE MOUNTPOINT
mtdblock0    31:0    0    4M  0 disk
mmcblk0     179:0    0 14.9G  0 disk
└─mmcblk0p1 179:1    0 14.8G  0 part /
6) Write the U-Boot binary to SPI flash using this command
sudo dd if=~/u-boot-spi.bin of=/dev/mtdblock0
7) Set DIP switches SW1 to SPI Boot and reboot the system.
Observe the first lines of boot message on serial console, it should display
BootROM - 1.73
Booting from SPI flash
Under U-Boot
Info
You will need to access to Helios4 via Serial Console. Please refer to Install page for instructions.
1) Upload the U-Boot SPI binary to /boot folder on Helios4 and rename it as u-boot-spi.bin.
For example, if the Helios4 IP address is 10.10.10.1 the command would be:
scp u-boot-spl.kwb root@10.10.10.1:/boot/u-boot-spi.bin
2) Switch to Helios4 serial console, login then reboot the system
sudo reboot
3) Press any key to cancel the U-Boot autoboot and execute these commands
load mmc 0:1 ${loaddaddr} /boot/u-boot-spi.bin
sf probe
sf erase 0 100000
sf write ${loadaddr} 0 ${filesize}
reset
4) Helios4 would reboot and boot to existing operating system.
Set Up U-Boot Environment
Important
Prebuilt SPI images for Armbian are configured to automatically run /boot/boot.scr on microSD or USB drive. There is no need to set up u-boot environment to boot Armbian.
Add U-Boot ENV variables to prevent U-Boot to relocate fdt and initrd into RAM address that is not accessible by kernel, and set the correct device tree name for Helios4 board
setenv fdt_high 0xffffffff
setenv initrd_high 0xffffffff
setenv fdtfile armada-388-helios4.dtb
saveenv
- To automatically boot Linux on microSD card
setenv bootargs '${console} root=/dev/mmcblk0p1 rootwait'
setenv bootcmd 'ext2load mmc 0:1 ${kernel_addr_r} /boot/zImage; ext2load mmc 0:1 ${ramdisk_addr_r} /boot/uInitrd; ext2load mmc 0:1 ${fdt_addr} /boot/dtb/${fdtfile}; bootz ${kernel_addr_r}  ${ramdisk_addr_r} ${fdt_addr}'
saveenv
- To automatically boot Linux on USB drive (assume UUID=1234)
setenv bootargs '${console} root=UUID=1234 rootwait'
setenv bootcmd 'usb start; ext2load usb 0:1 ${kernel_addr_r} /boot/zImage; ext2load usb 0:1 ${ramdisk_addr_r} /boot/uInitrd; ext2load usb 0:1 ${fdt_addr} /boot/dtb/${fdtfile}; bootz ${kernel_addr_r}  ${ramdisk_addr_r} ${fdt_addr}'
saveenv
Moving RootFS to Other Device
Now you have the option to move your Root FileSystem to a storage device connected to USB3.0. Under Armbian you can use the nand-sata-install utility to easily take care of this procedure.
Important
Only the USB top port is supported by U-Boot 2013. So you need to plug the storage device on which you want to move the RootFS in the top port. In U-Boot 2018 both USB ports are supported.
1) Enable the spi_workaround if it's not enabled yet (refer to the above section).
2) Run nand-sata-install utility
sudo nand-sata-install
3) Select option Boot from SPI - system on SATA, USB or NVMe
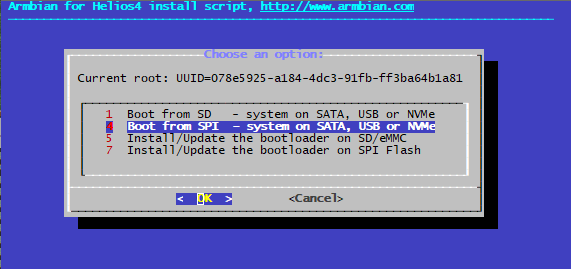
And follow the on screen instructions.
4) When RootFS migration is done, disable spi_workaround.
5) Set DIP switches SW1 to SPI Boot and reboot the system.
6) Check that your system has mounted the RootFS from the correct device. It shouldn't be /dev/mmcblk0p1
grep '/ ' /proc/mounts
/dev/sdb1 / ext4 rw,noatime,nodiratime,errors=remount-ro,commit=600 0 0
You can now remove your microSD Card. However you should keep it aside, it can be useful in case you need to recover your system.